
Replacing the synchro on a Kohler KDW 1003 engine involves several steps and requires a good understanding of engine components. click here for more details on the download manual…..
- KOHLER KDW: Adjusting the Valve Clearance PLEASE READ MANUAL AND FOLLOW ALL WARNINGS AND SAFETY INSTRUCTIONS!
The synchro, or synchronizer, is critical for maintaining correct timing and operation in the engine’s internal mechanisms. Below is a detailed guide on how to perform the replacement.
### Components Needed:
1. **Replacement Synchro**: Ensure you have the correct part that fits the Kohler KDW 1003 engine.
2. **Tools**:
– Socket set (metric)
– Torque wrench
– Screwdrivers (flathead and Phillips)
– Pliers
– Engine hoist or lifting device (if necessary)
– Oil catch pan
– Clean rags
– Safety glasses and gloves
### Preparation:
1. **Safety First**: Ensure you wear safety glasses and gloves throughout the process.
2. **Disconnect Battery**: Remove the negative terminal from the battery to prevent any electrical short-circuits.
3. **Drain Fluids**: If necessary, drain the engine oil and coolant into a suitable container. This will prevent spills during the replacement.
### Step-by-Step Replacement Process:
#### Step 1: Remove Engine Covers
1. **Remove the Engine Shroud**: Locate the screws or bolts that hold the engine shroud in place. Use the appropriate socket or screwdriver to carefully remove them.
2. **Set Aside the Shroud**: Once removed, place the engine shroud in a safe area.
#### Step 2: Access the Synchro
1. **Remove the Ignition Components**: Disconnect any wiring linked to the ignition system (spark plug wires, etc.) to avoid damage.
2. **Remove the Fuel Lines**: If necessary, disconnect the fuel lines leading to the engine, taking care to catch any residual fuel in the oil catch pan.
3. **Remove the Valve Cover**: Unscrew the bolts securing the valve cover, then lift the cover off to expose the engine’s internals.
#### Step 3: Remove the Old Synchro
1. **Identify the Synchro**: Locate the synchro which is typically positioned near the crankshaft or camshaft, depending on the engine design.
2. **Disconnect any Linkages**: If there are linkages or sensors connected to the synchro, carefully disconnect them.
3. **Unscrew the Synchro**: Use the socket set to remove the bolts that hold the synchro in place. Keep these bolts for reinstallation.
4. **Remove the Synchro**: Gently pull the old synchro out. If it’s stuck, use a soft mallet to tap it free, being cautious not to damage surrounding components.
#### Step 4: Install the New Synchro
1. **Prepare the New Synchro**: Inspect the new synchro for any damage and ensure it matches the old one.
2. **Position the New Synchro**: Align the new synchro with the mounting points and carefully insert it into place.
3. **Secure the Synchro**: Reinstall the bolts that hold the synchro, tightening them to the manufacturer’s specified torque settings using a torque wrench.
#### Step 5: Reassemble the Engine
1. **Reattach the Valve Cover**: Place the valve cover back on and secure it with the screws or bolts you removed earlier. Ensure a proper seal.
2. **Reconnect Fuel Lines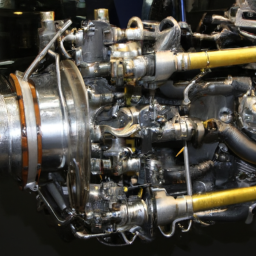 and Ignition Components**: Reattach any fuel lines and ignition wires you disconnected earlier.
3. **Reinstall the Engine Shroud**: Place the engine shroud back on and secure it with the screws or bolts.
#### Step 6: Refill Fluids
1. **Refill Engine Oil and Coolant**: If you drained fluids earlier, refill the engine oil and coolant to the appropriate levels.
2. **Reconnect the Battery**: Reconnect the negative terminal to the battery.
#### Step 7: Test the Engine
1. **Start the Engine**: Turn the ignition on and start the engine. Look for any leaks and listen for unusual noises.
2. **Check Functionality**: Ensure that the engine runs smoothly and that all components are functioning as they should.
### Final Notes:
– Always refer to the specific service manual for the Kohler KDW 1003 engine for torque specifications and any other unique instructions.
– If you are unsure about any step in the process, consult a professional mechanic to avoid potential damage to the engine.
By following these detailed steps, you should be able to successfully replace the synchro on your Kohler KDW 1003 engine.
A supercharger is a mechanical device designed to increase the power output of an internal combustion engine by forcing more air into the engine’s combustion chamber. This process enhances the engine’s efficiency and performance by allowing for a greater volume of air and fuel mixture to be combusted, resulting in increased horsepower and torque. Superchargers are typically driven by a belt connected to the engine’s crankshaft, which means they provide a boost in power instantly, as opposed to turbochargers that rely on exhaust gases and can experience a delay in power delivery, known as “turbo lag.”
There are several types of superchargers, including root-type, twin-screw, and centrifugal superchargers. Roots superchargers use two meshing lobes to draw in and compress the air, while twin-screw superchargers employ two rotors that compress the air as it moves through the device. Centrifugal superchargers, on the other hand, utilize a spinning impeller to generate boost by converting rotational energy into pressure.
Superchargers are commonly found in high-performance vehicles, muscle cars, and sports cars, where the demand for power is significantly higher. They offer the advantage of immediate throttle response, making them attractive for both street and race applications. However, they do require more engine power to operate, which can impact fuel efficiency. Despite this, many enthusiasts appreciate the exhilarating performance gains and distinctive sound that superchargers provide, making them a popular choice in the automotive aftermarket.