Adjusting the parking brake on a SMART Electric Drive involves several steps and requires specific tools and equipment. click here for more details on the download manual…..
- The Smart Car Now Sounds Like A Lambo 🏎💨 #Shorts The Smart Car Now Sounds Like A Lambo #shorts.
- NIO ET9 Has The Coolest Suspension Ever!
Below is a detailed guide on how to perform this adjustment, including descriptions of the components involved.
### Tools and Equipment Needed
1. **Jack and Jack Stands**: To lift and securely support the vehicle.
2. **Wrench Set**: For loosening and tightening bolts.
3. **Socket Set**: To access various nuts and bolts.
4. **Torque Wrench**: For ensuring components are tightened to manufacturer specifications.
5. **Screwdriver Set**: For removing any panels or covers if necessary.
6. **Measuring Tape**: To measure brake lever travel if required.
7. **Pliers**: For handling small components or clips.
8. **Shop Manual**: For the specific torque specifications and procedural details.
### Components Involved
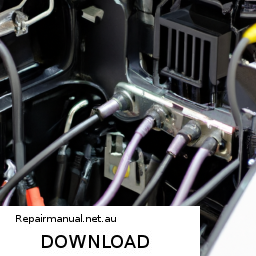
1. **Parking Brake Lever**: Located in the cabin, this is the lever you pull to engage the parking brake.
2. **Cable Assembly**: Connects the parking brake lever to the rear brake calipers.
3. **Brake Calipers**: These are the mechanisms that clamp down on the brake pads to hold the vehicle stationary.
4. **Adjuster Nut**: Located on the cable assembly, this nut is used to adjust the tension of the parking brake cable.
5. **Brake Shoes or Pads**: Depending on the system, these are the components that create friction against the brake rotors or drums to hold the vehicle.
### Steps for Parking Brake Adjustment
#### 1. Preparation
– **Park the Vehicle**: Ensure the vehicle is parked on a flat surface.
– **Set the Gear**: Place the vehicle in ‘Park’ (for automatic) or in gear (for manual).
– **Lift the Vehicle**: Use the jack to lift the rear of the vehicle and secure it with jack stands. Ensure the vehicle is stable before proceeding.
#### 2. Inspect the Components
– **Visual Inspection**: Check the parking brake lever’s condition and ensure it moves freely. Inspect the cable for frays or damage.
– **Check Brake Calipers**: Examine the brake calipers to ensure they are functioning properly and that the brake pads are in good condition.
#### 3. Adjust the Cable Tension
– **Locate the Adjuster Nut**: Find the parking brake cable adjuster, which is usually located near the rear of the vehicle where the cable runs to the calipers.
– **Loosen the Adjuster Nut**: Use a wrench or socket to loosen the nut. This will allow you to adjust the tension on the cable.
#### 4. Adjust the Parking Brake
– **Pull the Parking Brake Lever**: Pull the parking brake lever inside the vehicle to engage the brake while adjusting.
– **Tighten the Adjuster Nut**: While holding the lever, tighten the adjuster nut until you feel resistance. Do not overtighten; you want the brake to engage but still allow some movement.
– **Check Brake Lever Travel**: The ideal travel for the parking brake lever is typically around 5-7 clicks (check your vehicle’s service manual for specifics). Adjust until the lever’s movement is within this range.
#### 5. Test the Parking Brake
– **Lower the Vehicle**: Carefully remove the jack s tands and lower the vehicle back to the ground.
– **Test the Parking Brake**: With the vehicle on a flat surface, engage the parking brake and attempt to push the vehicle. It should hold firmly without slipping.
– **Adjust if Necessary**: If the parking brake does not hold, repeat the adjustment process.
#### 6. Final Check
– **Inspect for Issues**: After adjustments, ensure that the cables are not too tight or too loose, and inspect for any unusual noises or movement when the brake is engaged.
– **Road Test**: If possible, take the vehicle for a short drive to ensure the parking brake operates correctly under real conditions.
### Conclusion
Adjusting the parking brake on a SMART Electric Drive involves checking and adjusting the cable tension to ensure the parking brake engages effectively. always refer to the vehicle’s service manual for specific details and torque specifications. If you encounter any issues or are unsure, it is advisable to consult a professional mechanic.
The alternator belt, often referred to as the serpentine belt or accessory belt, is a crucial component in an internal combustion engine’s accessory drive system. This belt is responsible for transferring mechanical energy from the engine’s crankshaft to various accessories, including the alternator, power steering pump, water pump, air conditioning compressor, and sometimes the radiator fan. In most modern vehicles, the serpentine belt is a single continuous loop that wraps around multiple pulleys, allowing it to drive several components simultaneously.
The primary function of the alternator belt is to facilitate the operation of the alternator, which generates electrical power to charge the vehicle’s battery and supply electricity to the car’s electrical systems while the engine is running. When the engine is turned on, the rotation of the crankshaft drives the belt, which in turn rotates the alternator’s rotor, inducing electrical current through electromagnetic induction.
Over time, the alternator belt can wear due to friction, heat, and exposure to various environmental factors. Signs of a Failing alternator belt include squeaking or squealing noises, visible cracks or fraying, and decreased performance of the vehicle’s electrical systems. Regular inspection and maintenance of the alternator belt are essential for ensuring that the vehicle operates efficiently and preventing potential breakdowns. Replacing a worn or damaged alternator belt is a relatively straightforward task that can save drivers from more significant electrical issues and costly repairs down the line.